You can also watch this blog post as a video
Many fall into the trap of reading directly from their slides, neglecting to engage with the audience through meaningful dialogue. Effective meetings should foster active discussions rather than passive listening.
The structured nature of slide decks can stifle conversation until the presentation’s end. This format can cause attendees to disengage, waiting for the moment they can contribute their thoughts and feedback.
Draft a design document where you put in all your ideas, your thoughts, the nuances, the context, the history, the diagrams, whatever you want to share with your audience and give everyone access to this design document 24 to 48 hours prior to that and ask for comments.
This method ensures that meeting time is dedicated to debating contentious points, addressing disagreements, and forging a path forward.
The effectiveness of a design document lies in its structure and conciseness.
Consider including:
This strategy is not just for problem-solving or design meetings but can adapt to operational, support, or other discussions.
Let documentation drive your discussions, and if consensus is reached through the document alone, cancel the meeting.
# Title
## TLDR
A few short sentences that summarize the entire document. Use active voice and avoid using too much jargon. Keep it simple and straightforward.
## Definitions and Acronyms
Define all the technical terms you use. This will make sure everyone is speaking the same language. Don't go overboard with the definitions. Be reasonable.
| Item | Definition |
| ---- | --------------------------------- |
| API | Application Programming Interface |
| ... | ... |
## Context and History
### What We Have Today
Describe your current setup. Use visual aids when possible.
### What's Changing
Describe what's changing and why.
## Design
### A Survey of Existing Solutions
Discuss existing solutions. Include references to prior art, internal or external.
### Problem Constraints
Define the boundaries of the problem you're dealing with. What, how, why. I've discussed this at length in my [The Art of System Design video](https://youtu.be/3IWpU72eixw?si=nfVCZ5qAnAkPys8P).
### What We're Introducing
Describe what you're planning to implement. Use visual aids when necessary.
### What We Explored and Dismissed
Discuss what you've explored, trade-offs that were made, and why these candidate solutions were dismissed.
### Risks
- What are the risks associated with this implementation?
- Why are they risks?
- What are you going to do about them?
### Implementation Plan
- How are you going to implement your proposed design?
- How long will it take?
- What are the phases and steps?
## References
Include all the references you used in your document.
Technical Co-founder Presence: Assess if the founder has a technical co-founder. Without one, you may end up performing their duties without appropriate compensation.
Founder’s Venture Experience: Consider whether the startup is the founder’s first venture. Previous successes or failures can impart valuable experience, whereas a first-time founder may face significant learning curves and failures.
@glich.stream How to evaluate a startup before joining it as a founding software engineer. This is years of experience building and working in startups distilled in 7 minutes so that you avoid making painful mistakes. #softwareengineer #programming #coding #codinglife ♬ original sound - Pragmatic Engineer 👨💻
Financial Runway: Evaluate the startup’s financial runway, i.e., how many months it can operate before running out of funds. A good startup should have a sufficient runway, ideally up to two years, to reach product-market fit.
Founder-Investor Relationship: Investigate the relationship between the founders and their investors. A bad relationship can create internal friction and distract from achieving product-market fit.
Startup’s Funding Source: Understand how the startup is financing its operations. Founders using personal savings may be more risk-averse and controlling, whereas external funding might lessen the pressure.
Founder’s Industry Relevance: Check if the founders have experience in the industry of their startup. Lack of industry knowledge can lead to misjudging the market and the viability of the solution.
Perception of Engineering: Gauge how the founder perceives engineering work. Some may undervalue it or consider outsourcing it, while others might overemphasize it at the expense of business outcomes.
Shadow Stakeholders: Look out for hidden stakeholders who may influence decision-making, limiting the founder’s ability to effect positive changes quickly.
Presence of Advisors: Be wary of founders surrounded by numerous advisors, as their advice may be generic and not actionable, showing a lack of commitment to the startup’s specific challenges.
Founder’s Management Style: Consider if the founder is a micromanager, which can lead to focusing on trivial details over more critical aspects like product development and market fit.
]]>Our job is not to graduate technicians
This response came as I was discussing with him the role of the university in preparing students for the job market. Yet, I, as well as the vast majority of students in that department, were expecting exactly the opposite.
Universities should stop promoting themselves as institutions that prepare their students for the job market.
They aren’t, and that’s OK. Professors want to do research; a lot of them don’t even want to teach, and they’re most definitely not the most qualified to teach industry practices—an industry many of them haven’t even practiced in.
The world would be a far better place if we stopped associating degrees with intelligence or capability. The world would also be in a better position if we stopped considering alternative means of education as “lesser.” We would all be better off if not having a university degree were normalized.
The topics taught in a computer science program are very important. Mastering these topics takes a lifetime.
Why are we torturing everyone in these multi-year programs where, in the best-case scenario, students come out on the other end with a “mental index of relevant topics” but not necessarily any depth indicative of any level of mastery?
A university degree in tech is always an ineffective proxy indicator.
Universities are awesome. I wish I could go back and do more studying now that I know how to study and what. However, they are not programs designed to prepare anyone for the job market.
They can’t keep up.
]]>Here are the results of being a (part time) content creator for ~2 years now.
I created and published over 137 Youtube videos
(long and short form), in addition to 30 TikTok videos
(those that didn’t make it to Youtube), equivalent to hundreds of hours of content.
I single handedly scripted, shot, edited and designed an entire brand. Built and released a product and engaged with you all across 5 social media networks (Youtube, Facebook, Twitter, LinkedIn and TikTok).
Throughout this entire journey:
~148 EUR
from Youtube ad revenue, 0 EUR
from TikTok, Facebook, Twitter and LinkedIn.~2,000 EUR
from Patreon cumulative, 1 off donations and consulting work.49%
of this gross revenue was paid in taxes.Youtube ads revenue for the past 365 days
Channel analytics for the past 365 days
I know many other creators who made 0 USD
for all their years of sharing value with the world.
Moral of the story is, be kind to the content creators you like. Only a handful are getting rich in the process. The drive for many of us is to add value to the world and share our knowledge.
And for those who are inspired to create, know that this is a “long” and painful process. You will not get rich anytime soon EVEN when you go viral (and my content went viral several times).
Your drive needs to be something else.
And just to be clear, I’m not seeking advice or ideas on how to do better. I know exactly what I’m doing, and I know exactly that if I compromise some of the principles I’m building on top of (no clickbait bullshit), I can earn much more. This is a post to share my experience nothing more.
Stay awesome and keep building ❤️
]]>I’m not referring to titles. I’m referring to team dynamics roles (including but not limited to):
Then they proceed to fulfill the role that serves “the team” the most. Meaning, if the team already has a true leader but is missing the organizer, they become the organizer instead of passively aggressively fighting to replace the true leader.
This diffuses the team. It creates more natural pathways for collaboration & helps the whole team level up!
By doing so, these individuals indirectly set themselves up for success because they can spin the narrative in their favor & have evidence of their impact.
This never failed me, yet.
Disclaimer: The opinions shared are my own and do not represent my employers (current and former).
]]>⚠ Contrarian opinion and trigger warning
You’re an individual contributor in a team that’s drowning from overwork. You’re not the only one who’s exhausted, but everyone is worried about talking. Everyone is too busy thinking about their next promotion and bonus opportunity that they’re willing to sacrifice and stay quiet.
When you’re discussing the situation off the record, everyone seems to share the same opinion that things could be much better. However, in their 1-1’s with their managers and in public communication channels, nobody is discussing the problems.
This is overcompensation.
People are contributing more than what they should be to keep the business going. If the business grows only by overworking the team, then it’s not sustainable.
Sometimes, you have to watch an organization burn for it to evolve.
Decision makers, especially in large enterprises, are often not aware of the problems their teams deal with on a daily basis. They don’t know when they’re overworking the team, especially when there are no clear (objective) indicators of performance.
On top of that, even when the leadership team (LT) knows they’re overworking the team, they might be dealing with another set of problems. If the team isn’t complaining and the churn rate is acceptable, the LT might keep on prioritizing other problems.
It’s very important for contributors to constantly be providing the adequate feedback upwards.
Sometimes that feedback comes in the form of not accepting extra work and just watching the house of cards collapse. Not out of malice, but out of necessity for change.
Disclaimer: The opinions shared are my own and do not represent my employers (current and former).
]]>TLDR; Instructions for setting up podman and docker-compose on MacOS
These instructions are designed to be an attachment to my video series on podman and Docker.
⚠️ Follow these instructions at your own risk
# Start a podman machine with 2 vCPUs and 4GBs of RAM and 15GBs of Disk space
$ podman machine init --cpus 2 -m 4096 --disk-size 15
# Start the machine
$ podman machine start
# SSH into the machine
$ podman machine ssh
#############################
# Inside the CoreOS machine #
#############################
# Edit .bashrc for the user core
$ vi ~/.bashrc
# Add to the bottom of the file
docker () {
if [ "$1" = "system" ] && [ "$2" = "dial-stdio" ]; then
exec socat - "/run/user/1000/podman/podman.sock"
fi
exec /usr/bin/docker $@
}
$ sudo su -
# vi ~/.bashrc
# Add to the bottom of the file
docker () {
if [ "$1" = "system" ] && [ "$2" = "dial-stdio" ]; then
exec socat - "/run/podman/podman.sock"
fi
exec /usr/bin/docker $@
}
# Reduce this security feature to be on-par with the experience we're used to with Docker.
$ sudo sed -i 's/short-name-mode="enforcing"/short-name-mode="permissive"/g' /etc/containers/registries.conf
############################
# Host: MacOS #
############################
# Edit the ~/.ssh/config and add the following to the bottom
Host localhost
HostName 127.0.0.1
IdentityFile ~/.ssh/<PODMAN_MACHINE_NAME>
StrictHostKeyChecking no
# Get the list of connections
$ podman system connection ls
# Set the DOCKER_HOST variable (docker server)
## Fish shell
# $ set -gx DOCKER_HOST ssh://root@localhost:<PORT>
# Bash
$ export DOCKER_HOST="ssh://root@localhost:<PORT>"
# Test
$ docker version
# Disable docker-compose from using the Docker CLI when executing a build
## Fish shell
# $ set -gx COMPOSE_DOCKER_CLI_BUILD 0
# Bash
$ export COMPOSE_DOCKER_CLI_BUILD=0
# Setup a virutalenv
$ virtualenv --python=(which python3) ./venv
# Active virtualenv
## Fish shell
# $ . venv/bin/activate.fish
# Bash
$ . venv/bin/activate
# Install docker-compose v1.x
$ pip3 install docker-compose
# Test by getting the version of docker-compose
$ docker-compose -v
TLDR; Using GitHub Apps to call GitHub’s REST and GraphQL APIs
If you’re a GitHub power user, or an enterprise administrator, or you just had to set up some automation or integration you had to use of the REST or GraphQL APIs in a way or another.
The majority of GitHub’s API resources require authentication. There are 2 methods of authentication:
We’re going to ignore basic authentication in this post and will focus on the Personal Access Tokens and OAuth tokens. This table describes the features of each token type:
Feature | Personal Access Token (PAT) | OAuth App Access Token | GitHub App Installation Access Token |
---|---|---|---|
Granular / customizable access scope and permissions | yes | no | yes |
Access scope is bound by user permissions | yes | yes | no |
Self expire (after a period of time) | no | yes | yes |
Configurable expiration duration | no | no | no |
Generated via APIs | no | yes | yes |
Can be revoked on demand | no | yes | yes |
Requires installation | no | no | yes |
Bound by API rate limits | yes | yes | yes |
Impersonate authenticated account | yes | yes | yes |
Act as the app (do not impersonate an authenticated account) | no | no | yes |
Of course there are many more distinctions but for the purposes of this post, I’ll be focusing on those only.
I really like this visual from the official docs for determining which method is the best:
I personally really like GitHub Apps as they can be used for both user to server
and server to server
integrations. I believe they are the future of integrations with GitHub, their main problem is that they’re not very easy to set up and play with.
However, once you have a good understand of the basic concepts, you’ll also start liking them as I do.
To work with GitHub Apps there are 3 things to do:
I did not link the 3rd step to the docs because I’ll be describing the process of generating an installation access token here.
This step requires jwt-cli or anything else that provides similar functionality.
Once you have jwt-cli
setup and ready, let’s do a quick sanity check:
# Check jwt-cli version
jwt --version
Next, we need to create a private key for the GitHub App we created by following this guide.
Do you have the PEM
file downloaded? Let’s do another quick sanity check. We print out the first 1 to 10 characters of each line of the PEM file to check its content while avoiding exposing it.
# Print the first 1 to 10 characters of each line of the PEM file
cat ~/Downloads/our-github-app-private-key.pem | cut -c 1-10
-----BEGIN
MIIEowIBAA
EWvM/c5vO3
buxJtiE4lQ
MBOY8KgDdX
ZNMczYnLs/
McDFdqSyC/
IoSt9tfj0A
5f6WTf9zeO
NErdZLLaub
SQMznabRo8
owAApBGu+M
G1fsHQECgY
OXWnyxqKUN
aT3g4jEG68
BL+5WP/SKx
0aSKYMaic3
m+MOxumCD7
YtwOhGHjO9
GV7iByqFOn
5V2jMNlC/x
8v6Z1u/bHr
egKQtvdDX7
YcuZVQKBgE
J6N6fn+4fa
+N7HgFtEKA
-----END R
Now we need to convert the PEM
file to DER
(just the binary form of the PEM file) format:
# Convert PEM to DER encoded key
openssl rsa -outform der -in our-github-app-private-key.pem -out our-github-app-key-DER.key
# You should have a new file in your directory called our-github-app-key-DER.key
Let’s generate a JWT (JSON web token) which we will use to authenticate the subsequent API requests:
# Will generate a JWT with the following properties:
# -A | algorithm: RS256
# -e | expiry time: 10 minutes
# -i | issuer: GitHub App ID (you can get it from the settings page of the app)
# -P | payload: JWT payload: https://jwt.io/introduction
# -S | secret / key: The DER key for our GitHub App
# This assumes you're using bash as a shell, if you're using something else you need to adapt the command to your shell
APP_JWT=$(jwt encode \
-A RS256 \
-e $(( $(date +%s) + $(( 10 * 60 )) )) \
-i <APP_ID> \
-P iat=$(( $(date +%s) - 60 )) \
-S @our-github-app-key-DER.key)
mbiCIce4NjZxIYe6hKqFxeO_myB0X-cSCVrtd6KXLPXRp94rvj-hhu4iCRLcfX-jel76_-TJErVCGxCyUhElAE6gPG85MyqN97U7C2EFN8dIbU47zqj9wXX3917NYfiGET99LYR_r7_yJ6oQadJVy7Szggj.Dt0g6T6VASyv_feNBYidlfN2ZsSlQt1niPn5Zbi8ab14Jpw9zc6XLWJ6BI-85rzfhoDpaCwnsMNebnUNQodGq0aQuOI2pHzrhTJyShqsehcCPl1PZZHSFixxNGmG4afIxxXigWNf2NIJF-D_z3iKObW_UUYeDiFDVmcDXaJW80UZfZlvz3DjfKxBiGJeiynOz2yMnX3uz99rLUg-nh6Z6I9LeuKMkqjpB3L2dTS1MbrHWvnx64OCKdJ-TlBoYYJR5K5IO.YBiH4fg2t7z-jGOhZ66M
We will now use the JWT we generated in the previous step to fetch the list of installations of our app. Remember, a GitHub app can be installed for many repositories, organizations or users.
curl \
-H "Authorization: Bearer ""${APP_JWT}" \
-H "Accept: application/vnd.github.v3+json" \
https://api.github.com/app/installations
[
{
"id": 16999999,
"account": {
"login": "RANDOM_ORG_NAME 1",
"id": 80999999,
...
},
"repository_selection": "all",
...
"permissions": {
...
},
"events": [
...
],
"created_at": "2021-05-17T09:33:39.000Z",
"updated_at": "2021-05-20T17:58:35.000Z",
"single_file_name": null,
"has_multiple_single_files": false,
"single_file_paths": [
...
],
"suspended_by": null,
"suspended_at": null
},
{
"id": 17999999,
"account": {
"login": "RANDOM_ORG_NAME 2",
"id": 81999999,
...
},
"repository_selection": "all",
...
"permissions": {
...
},
"events": [
...
],
"created_at": "2021-05-17T09:33:39.000Z",
"updated_at": "2021-05-20T17:58:35.000Z",
"single_file_name": null,
"has_multiple_single_files": false,
"single_file_paths": [
...
],
"suspended_by": null,
"suspended_at": null
}
]
Copy the installation id for the repository, organization or user you want to use:
// First installation
{
"id": 16999999, // <- This is the installation id
"account": {
"login": "RANDOM_ORG_NAME 1",
...
// Second installation
{
"id": 17999999, // <- This is the installation id
"account": {
"login": "RANDOM_ORG_NAME 2",
...
Generate the installation access token
# Put the installation id in a variable
APP_INSTALLATION_ID=16985135
# Generate an access token
curl -s \
-X POST \
-H "Authorization: Bearer ""${APP_JWT}" \
-H "Accept: application/vnd.github.v3+json" \
https://api.github.com/app/installations/"${APP_INSTALLATION_ID}"/access_tokens
{
"token": "ghs_akiE7tSItG8SeH5M8gGn05JhAsbcL4uh2vWB0",
"expires_at": "2021-07-07T19:19:36Z",
"permissions": {
...
},
"repository_selection": "all"
}
With the token generated in the previous step, call the resources within your permissions scope as such:
APP_TOKEN="ghs_akiE7tSItG8SeH5M8gGn05JhAsbcL4uh2vWB0"
curl -s \
-H "Authorization: token ""${APP_TOKEN}" \
-H "Accept: application/vnd.github.v3+json" \
https://api.github.com/orgs/<ORG_NAME>/repos
[
{
"id": 432071637,
"node_id": "jGDnD=zOa9Y3lMQNExRMlcXkzMzJwMvc",
"name": "random-repo-name",
"full_name": "ORGNAME/random-repo-name",
"private": true,
"owner": {
...
},
"html_url": "...",
"description": "...",
"fork": false,
...
}
]
That’s quite a lengthy process, right? Yeah, I thought so. It is also slightly intimidating. That’s why I create ghtoken
. A simple bash utility that encapsulates all the above and allows you to generate / revoke installation access tokens very quickly.
This gif illustrates how ghtoken
works, it’s the steps as described before with a bunch of boilerplate code to handle different scenarios:
1. Run ghtoken
assuming jwt-cli
is already installed
$ ghtoken generate \
--key ./.keys/private-key.pem \
--app_id 1122334 \
| jq
{
"token": "ghs_g7___MlQiHCYI__________7j1IY2thKXF",
"expires_at": "2021-04-28T15:53:44Z"
}
2. Run ghtoken
and install jwt-cli
# Assumed starting point
.
├── .keys
│ └── private-key.pem
├── README.md
└── ghtoken
1 directory, 3 files
# Run ghtoken and add --install_jwt_cli
$ ghtoken generate \
--key ./.keys/private-key.pem \
--app_id 1122334 \
--install_jwt_cli \
| jq
{
"token": "ghs_8Joht_______________bLCMS___M0EPOhJ",
"expires_at": "2021-04-28T15:55:32Z"
}
# jwt-cli will be downloaded in the same directory
.
├── .keys
│ └── private-repo-checkout.2021-04-22.private-key.pem
├── README.md
├── ghtoken
└── jwt
3. Revoke an installation access token
# Run ghtoken with the revoke command
$ ghtoken revoke \
--token "v1.bb1___168d_____________1202bb8753b133919"
--hostname "github.example.com"
204: Token revoked successfully
ghtoken
?ghtoken
is hosted and maintained in this repository: https://github.com/Link-/github-app-bash
Disclaimer: The opinions shared are my own and do not represent my employers (current and former).
]]>Concept and article created by @Link- @droidpl and @steffen
TLDR; You’ve explored GitHub Actions for a while, and you’re now ready to create your own action and publish it to the marketplace. That’s brilliant, before you do that, let’s discuss adopting a simple design pattern that will make your creative journey much easier!
A simple Node.js action would look like this:
./simple-action/
├── LICENSE
├── README.md
├── action.yml
├── dist
│ └── index.js
├── index.js
├── package-lock.json
└── package.json
index.js
is where all the logic is encapsulated and action.yml
is used to contain the action’s metadata as well as defining its interface (inputs and outputs).
A lot of actions on the marketplace adopt this very simple structure, and it’s great! However, not all actions are this simple.
With actions doing more complex things testability and maintainability become really difficult with this approach. Why?
Testing a change requires that you commit and push your changes upstream, then trigger a workflow run under the conditions your action is expecting. This is very time-consuming.
Updating the interface can become a challenge especially when you want to maintain backward compatibility.
You might say: hey! act is a wonderful project that allows you to run and test actions on your machine. Yes, but its only problem is that during the initial iterations you want to test fast and fail quickly. You might also want to write some unit (integration?) tests.
Command pattern to the rescue. In short, this is a behavioral design pattern that allows you to encapsulate all the information about the task in a single object which can then be invoked by certain triggers.
I’m definitely not going to do a better job at explaining this concept more than: https://refactoring.guru/design-patterns/command
There’s a better looking class diagram here: https://refactoring.guru/design-patterns/command#pseudocode
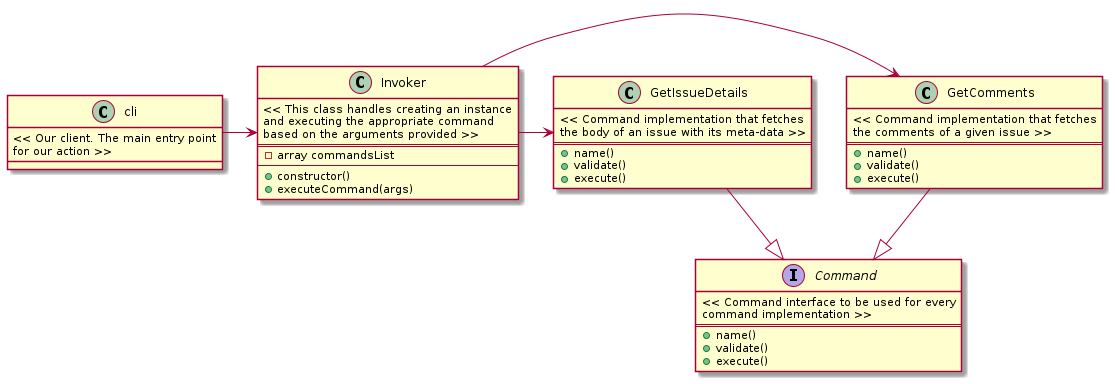
What the class diagram above is trying to explain is:
cli
will create an instance of Invoker
Invoker
will load all the classes that implement the Command
interfaceInvoker
will create instances of GetComments
and GetIssueDetails
classesInvoker
will store the instances in commandsList
cli
will then call executeCommand()
and pass the arguments (inputs) it receivedInvoker
will call execute()
on the command matching the passed arguments from cli
and return the result from the Command
implementation invokedcli
is never aware which commands are called. It doesn’t even need to be aware of inner workings of any command. cli
will always have a single interface that it needs to be aware of.
The logic of instantiating and invoking commands is all encapsulated in 1 place, the Invoker
object.
You can add an unlimited number of commands. As long as they implement the Command
interface the Invoker
will make sure they are loaded and instantiated to be used by any client.
simple-action/
├── LICENSE
├── README.md
├── action.yml
├── dist
│ └── index.js
├── package-lock.json
├── package.json
└── src
├── cli.js
├── commands
│ ├── getComments.js
│ ├── getIssueDetails.js
│ └── index.js
├── interfaces
│ └── command.js
└── invoker.js
Our folder structure should now look like 👆. Let’s look at the source code:
const meta = require("../package.json");
const Invoker = require("./invoker");
const core = require("@actions/core");
const { Command } = require("commander");
const program = new Command();
/**
* We make use of the default option to fetch the input from our action
* with core.getInput() only when a value has not been supplied via the CLI.
* What this means is that, if you provide these parameters the values from
* the action will be ignored.
*
* This will guarantee that this tool will operate as an action but has an
* alternative trigger via the CLI.
*/
program
.version(meta.version)
.option(
"-c, --command <command name>",
"Command to execute",
core.getInput("command")
)
.option(
"-t, --token <token>",
"Personal Access Token or GITHUB_TOKEN",
core.getInput("token")
)
.option(
"-i, --issue-number <number>",
"Issue number",
core.getInput("issue-number")
)
.option("-o, --org <org_name>", "Organisation name", core.getInput("org"))
.option("-r, --repo <repo_name>", "Repository name", core.getInput("repo"))
.parse();
/**
* await won’t work in the top-level code so we have to wrap it with an
* anonymous async function and invoke it
*
* More details: https://javascript.info/async-await
*/
(async () => {
try {
const options = program.opts();
const invoker = new Invoker(options);
const result = await invoker.executeCommand(options);
core.setOutput("result", result);
} catch (Error) {
core.setFailed(` ⚠️ ${Error.message}`);
}
})();
const commands = require("./commands");
class Invoker {
constructor(options) {
this.commandsList = {};
this.options = options || null;
this.loadCommands();
}
/**
* Create a new instance of each command loaded from ./commands
* and add it to the commandsList instance variable
*/
loadCommands() {
commands.reduce((accumulator, command) => {
let instance = new command(this.options);
accumulator[instance.name()] = instance;
return accumulator;
}, this.commandsList);
}
/**
* Runs a number of checks and attemps to execute a command
* @param {Object} options
* @returns
*/
async executeCommand(options) {
// It's possible to supply an empty string as a command name so we have
// to guard against this
if (!options.command) {
throw new Error(
"required option '-c, --command <command name>' command name must be supplied"
);
}
// We need to make sure the command name provided matches the name of one of
// our loaded commands. Remember, loadCommands() uses the command name
// as the key in the commandsList dictionary
if (!(options.command in this.commandsList)) {
throw new Error(`${options.command} not found in the loaded commands`);
}
const command = this.commandsList[options.command];
// If all the checks pass, we're good to execute the command
return await command.execute(options);
}
}
module.exports = Invoker;
/**
* This will behave as an abstract class for all the commands we're going to
* create that adopt this interface
*/
class Command {
constructor(options) {
if (this.constructor === Command) {
throw new Error("Abstract classes can't be instantiated.");
}
}
name() {
throw new Error("Method 'name()' must be implemented first");
}
validate() {
throw new Error("Method 'validate()' must be implemented first");
}
async execute() {
throw new Error("Method 'execute()' must be implemented first");
}
}
module.exports = Command;
This is a sample command implementation
const Command = require("../interfaces/command");
class GetComments extends Command {
constructor() {
super();
}
name() {
return "get_comments";
}
/**
* Run all the validations necessary before you attempt to execute
* the command. Here we are doing a simple test just to illustrate the
* purpose of this method.
*
* @param {Object} options
* @returns validation result
*/
validate(options) {
if (Object.keys(options).length <= 2) {
throw new Error(`Command options must be provided`);
}
return true;
}
/**
* Attempts to execute the work
*
* @param {Object} options
* @returns Result of the execution
*/
async execute(options) {
this.validate(options);
return JSON.stringify({
status: "OK",
output: `${this.name()} executed successfully 🙌`,
});
}
}
module.exports = GetComments;
This is another sample command implementation.
const Command = require("../interfaces/command");
class GetIssueDetails extends Command {
constructor() {
super();
}
name() {
return "get_issue_details";
}
/**
* Run all the validations necessary before you attempt to execute
* the command. Here we are doing a simple test just to illustrate the
* purpose of this method.
*
* @param {Object} options
* @returns validation result
*/
validate(options) {
if (Object.keys(options).length <= 2) {
throw new Error(`Command options must be provided`);
}
return true;
}
/**
* Attempts to execute the work
*
* @param {Object} options
* @returns Result of the execution
*/
async execute(options) {
this.validate(options);
return JSON.stringify({
status: "OK",
output: `${this.name()} executed successfully 🙌`,
});
}
}
module.exports = GetIssueDetails;
This is a neat little trick that will allow us to import all the commands listed in it without looping through the content of the path and requiring each file individually. When require is given the path of a folder, it’ll look for an index.js
file in that folder; if there is one, it uses that, and if there isn’t, it fails. To prevent this failure, we create an index.js
and require all the individual commands.
module.exports = [require("./getComments"), require("./getIssueDetails")];
With the above you can easily implement tests per command as their logic is now decoupled from the workflow’s interface requirements. Adding more commands is simple as creating a new file and updating the required inputs (if necessary).
It’s definitely more boilerplate code but if you’re building complex workflows, this is definitely the way to go.
]]>If you do implement this approach, reach out to me via Twitter I’d love to read your thoughts on it!
Having been burnt a lot in the past with disks getting irreparably damaged and losing data, I made 2 changes to how I use my devices:
However, there are a number of things like my dotfiles, automation scripts, and workflow configurations that is still manage locally. There are definitely some neat solution for managing those but I never invested the time in setting them up. Solutions like: chezmoi
Long story short, let’s discuss what I have built for backing up these files.
I use fish shell. Judge me all you want, don’t care. I like it. This is the first piece of the puzzle. The following fish function will sync a directory and all its content into a folder in Dropbox.
# Create the folder that will contain our backup scripts
mkdir -p ~/.backup/bin
cd ~/.backup/bin
# Create a new function
touch <name-of-the-function>.fish
This will be the content of your script. Do not forget to replace the placeholders!
#!/usr/local/bin/fish
# Replace <ORIGINAL_FOLDER> and <FOLDER_ON_DROPBOX> with the correct values
if test "$argv[1]" = 'dry-run'
echo 'DRY-RUN'
rsync -anzP <ORIGINAL_FOLDER> <FOLDER_ON_DROPBOX>
else
rsync -azP <ORIGINAL_FOLDER> <FOLDER_ON_DROPBOX>
end
Don’t forget to make the script executable with:
# This wil change the file permission of your script to be: 0755
chmod a+x ~/.backup/bin/<name-of-the-function>.fish
The function above will sync the directory and its entire subtree to the location you specified on Dropbox. It also provides a dry-run
paramter to test it before running the real thing, give it a spin before you move forward.
# Just pass dry-run after the function name in your terminal
<name-of-the-function>.fish dry-run
This article “how to use launchd to run services in macos” does a great job in giving you a primer on launchd
. Check it out before we start creating our agent.
The agent below will run your <name-of-the-function>.fish
exactly every night at 5 minutes past midnight. It will create output and error logs in /tmp
and will run for the first time as soon you load the agent.
Navigate to ~/Library/LaunchAgents
cd ~/Library/LaunchAgents
Create a new property list (.plist) file and name it something relevant
# Replace <data identifier> with anything more suitable
touch com.<data identifier>.backup.plist
Paste this into your file and don’t forget to replace the placeholders!
<?xml version="1.0" encoding="UTF-8"?>
<!DOCTYPE plist PUBLIC "-//Apple Computer//DTD PLIST 1.0//EN"
"http://www.apple.com/DTDs/PropertyList-1.0.dtd">
<plist version="1.0">
<dict>
<key>Label</key>
<string>com.<data identifier>.backup</string>
<key>ProgramArguments</key>
<array>
<string>/usr/local/bin/fish</string>
<string>/Users/<your-username>/.backup/bin/<name-of-the-function>.fish</string>
</array>
<key>RunAtLoad</key>
<true/>
<key>StandardErrorPath</key>
<string>/tmp/com.<data identifier>.backup.error</string>
<key>StandardOutPath</key>
<string>/tmp/com.<data identifier>.backup.stdout</string>
<key>StartCalendarInterval</key>
<dict>
<key>Minute</key>
<integer>5</integer>
<key>Hour</key>
<integer>0</integer>
</dict>
</dict>
</plist>
Load the property list file
launchctl load ~/Library/LaunchAgents/com.<data identifier>.backup.plist
# You can also unload it with - but don't run this now!
# launchctl unload ~/Library/LaunchAgents/com.<data identifier>.backup.plist
Start the job
launchctl start ~/Library/LaunchAgents/com.<data identifier>.backup.plist
Verify that the job’s been added
launchctl list | grep com.<data identifier>.backup
<key>StartCalendarInterval</key>
<dict>
<key>Minute</key>
<integer>5</integer>
<key>Hour</key>
<integer>0</integer>
</dict>
Out of the entire definition, I think this is the most interesting part of the file. With StartCalendarInterval
you can schedule a job to run at a specific date/time. The available keys are:
Month | Integer | Month of year (1..12, 1 being January) |
---|---|---|
Day | Integer | Day of month (1..31) |
Weekday | Integer | Day of week (0..7, 0 and 7 being Sunday) |
Hour | Integer | Hour of day (0..23) |
Minute | Integer | Minute of hour (0..59) |
If you want a job to run everyday at a designated time, just specify the Hour
and Minute
values and you’re good to go! Make sure to go through this fantastic reference to spare yourself a lot of agony: https://www.launchd.info/
Console.app
. Just run it, navigate to system.log
and query the name of your plist file. Here’s an example below:stdout
and stderr
files. We’ve specified those files to be written in /tmp
. The reason for that is we don’t really care about maintaining these logs for a long time. As soon as you reboot your system these files are gone. If the files have been created successfully and contain data, then you’ve setup your agent successfully!This is the most annoying error you might face. It’s very cryptic and doesn’t indicate at all what’s wrong with your property list file. Unfortunately, if you receive this error code you will have to revisit every item in your property list file and make sure it’s correct.
Disclaimer: The opinions shared are my own and do not represent my employers (current and former).
]]>